As I mentioned before, I got some delicious apples (but not golden delicious, actually I can't remember what kind they are. It was a type I hadn't heard before) at Huber's when we went a little while ago. I think its been two weeks, wow! Time flies.
That night I made Apple Strudel muffins for the tailgate at church the next morning. They went over really well and since I doubled the recipe, provided breakfast for the next week! Here is the recipe (courtesy of AllRecipes.com) with my modifications.
Apple Strudel Muffins
Muffins:
2 cups flour
1 teaspoon baking powder
1/2 teaspoon baking soda
1/2 teaspoon salt
1/2 cup butter (I used real unsalted butter)
1/2 cup white sugar
1/2 cup brown sugar
2 eggs
1 teaspoon cinnamon
1 1/4 teaspoon vanilla
1 cup chopped apples (about 2 apples, depending on size)
1 cup shredded apples (about 3 apples, depending on size)
(I shredded with a cheese grater to get the juice out & make the muffins moist)
Topping:
1/3 cup packed brown sugar
1 tablespoon flour
1/8 teaspoon cinnamon
1 tablespoon butter, melted
1. Preheat oven to 375. Grease a 12 cup muffin pan, or fill with liners. You could also use a 24 cup mini-muffin pan, greased.
2. In a medium bowl, mix flour, baking powder & soda, and salt.
3. In a large bowl beat together butter, sugar and eggs until smooth. Mix in vanilla and shredded apples. Stir in chopped apples and gradually blend in the flour mixture. Spoon mixture into muffin pan.
4. In a small bow mix brown sugar, flour and cinnamon. Add butter until mixture is coarse like crumbs. Sprinkle over tops of mixture in muffin pan.
5. Bake 20 minutes in preheated oven or until a toothpick comes out clean. Allow to sit 5 minutes before removing muffins from pan. Cool on wire rack.
Enjoy!
Apple Crisp
1/2 cup flour
1/2 cup oats (any kind works)
2/3 cup brown sugar
3/4 teaspoon cinnamon
3/4 teaspoon nutmeg (I never have this so I don't put it in. It's up to you!)
1/4 cup chopped pecans, optional ( I NEVER put this in...I dislike nuts mixed in my food, texture thing)
1/3 cup melted margarine
3 pounds of apples, (about 9-10) peeled and chopped in about 1/2 inch pieces
1/2 cup white sugar
1 1/2 - 2 tablespoons lemon juice
1. Preheat oven to 350.
2. Chop and peel apples (the most time consuming part!). In large bowl mix apples, lemon juice (if you use a full 2 tablespoons, there might be extra juice after its baked) and cinnamon and 1/2 cup white sugar. If this bowl has a lid, it makes mixing so much easier!
3. Put apples into 2 quart or 2.5 quart (that's what I used) baking dish.
4. In medium bowl mix flour, oats, brown sugar, cinnamon and nutmeg. Mix in margarine. Cover apples with mixture.
5. Bake in preheated oven for 50-60 minutes. Allow to cool about 15 minutes before eating.
**I just took this out of the oven and it smells DELICIOUS!!! Tastes that way too!!**
Variation:
Cherry Crisp
When I don't have fresh apples, I use a can of cherry pie filling (21 oz), add some frozen berry mixture (raspberries, strawberries, blueberries & blackberries) over top of the cherry pie filling and double the crumbly topping (because it's so good!!). Bake for about 25-30 minutes. It's probably one of my favorite desserts, and the easiest!
I hope you enjoy these recipes!!

Monday, October 18, 2010


Thursday, October 14, 2010
Pottery Barn Inspired Hurricanes {Tutorial}
If I could afford it, I might buy things from Pottery Barn. I said might because of several reasons. I love bargains, they make me so much happier than paying full price. Second, I love the satisfaction of making something stylish and pretty....from the dollar store. I love getting "I love that!" and saying "Thanks! I made it!" I got that several times in one day with this necklace. Love it!
Back to Pottery Barn. You may have seen these pieces in their store/site.


Step 6. Put glue on rim of candlestick. (If you use E6000, follow the package directions and let it sit for 2 minutes before putting anything on it. Make sure you open a window to. It's strong.

Step 7. Attach glass and candlestick. It was easiest for me to turn the glass upside down and put the candlestick on that way. The trickiest part was getting it centered. I am OCD so it mattered (a little too much). But I don't think I even got it centered on all of them. Twitch.


Step 8. Let glue dry. I let mine dry for about a day before using them.

And here are mine filled with (Dollar Tree) fall decor!

(I had the raffia already, candle from Hobby Lobby, stones from Family Dollar, leaves & gourds from Dollar Tree)
The best part about these hurricanes is that they can be used year round, just change the filler! I already have my Christmas filler. Yes, from Dollar Tree.
Cost:
3 Candlesticks - $3.18
3 Vases - $3.18
Leaves - $1.06
Gourds - $1.06
Rocks - $1.06
Total: $9.54
I cannot find the original post that I saw this Dollar Tree idea on (sorry!) but here is another version. I like seeing other people's versions of the same idea. Very creative to use the "religious" candles inside! Might have to pick one up...I plan on making another tall one (or two or three). I really would like to get an apothecary jar with a lid and put it on a candlestick, but I can't find one for the right price. Suggestions?
If you make some of your own, I'd love to see them!
Back to Pottery Barn. You may have seen these pieces in their store/site.


Aren't they gorgeous! I especially LOVE the tall ones with the lids. BUT, the one's in the first picture are $54-69 and the second $16-39. No thanks.
Enter wonderful blogs that showed me how to do it for much cheaper.
Step 1. Drive to nearest Dollar Tree.
Step 2. Pick out whatever glassware makes your heart happy. It's all $1. Yup. Only $1 at Dollar Tree.
Step 3. For each glass item you pick, get a glass candlestick. Also $1 a piece. (Draw back: there is only one height. If you want the candlesticks to be different heights, swing by Goodwill, they almost always have lone candlesticks waiting to be adopted. Or get different heights of glassware like I did)
Step 4. Make sure you have pretty strong glue that bonds glass (E6000 or a hot glue gun, I used E6000).
Step 5. Head home (or also pick up some great "filler" for your hurricanes at the Dollar Store. It will only be a dollar.)

Step 6. Put glue on rim of candlestick. (If you use E6000, follow the package directions and let it sit for 2 minutes before putting anything on it. Make sure you open a window to. It's strong.

Step 7. Attach glass and candlestick. It was easiest for me to turn the glass upside down and put the candlestick on that way. The trickiest part was getting it centered. I am OCD so it mattered (a little too much). But I don't think I even got it centered on all of them. Twitch.
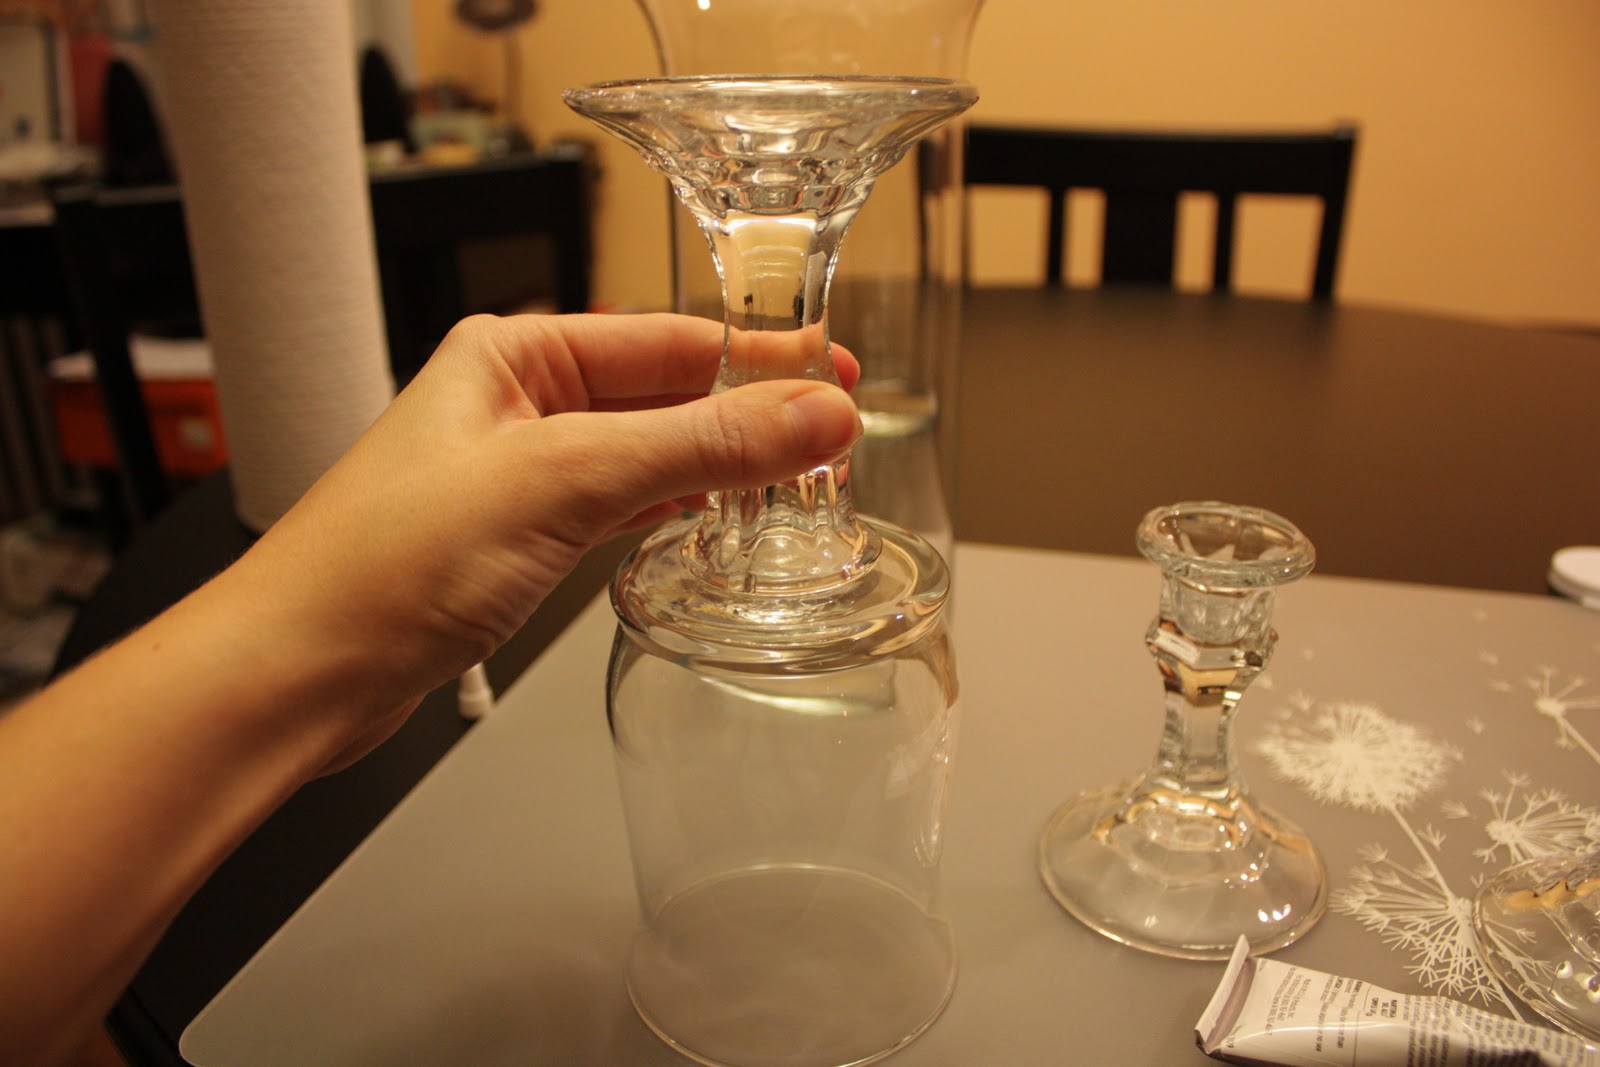

Step 8. Let glue dry. I let mine dry for about a day before using them.

And here are mine filled with (Dollar Tree) fall decor!

(I had the raffia already, candle from Hobby Lobby, stones from Family Dollar, leaves & gourds from Dollar Tree)
The best part about these hurricanes is that they can be used year round, just change the filler! I already have my Christmas filler. Yes, from Dollar Tree.
Cost:
3 Candlesticks - $3.18
3 Vases - $3.18
Leaves - $1.06
Gourds - $1.06
Rocks - $1.06
Total: $9.54
I cannot find the original post that I saw this Dollar Tree idea on (sorry!) but here is another version. I like seeing other people's versions of the same idea. Very creative to use the "religious" candles inside! Might have to pick one up...I plan on making another tall one (or two or three). I really would like to get an apothecary jar with a lid and put it on a candlestick, but I can't find one for the right price. Suggestions?
If you make some of your own, I'd love to see them!
Makeover!
You may notice the complete makeover of the blog...I was looking at my last design and decided there was WAY too much color for me! I love neutrals because when you add a color, it pops so much more. So I hope you like this one! It may change (the banner's details) a little once I have more time to play around. I'm using GIMP (like photoshop, but free) and it can be annoyingly complicated. Anyone used GIMP before?
Well I started my new job yesterday (Tuesday) and so far so good. It's a lot of information, not a lot of explanation and a lot of me asking questions or going "huh?". It is taking me a while to adjust to a Monday thru Friday full time job again (haven't had that schedule since the end of last year!!). That would explain why I am up right now. My brain needs some good sleep, especially after day 2 of the job and finishing up my tedious projects at the Paint Spot after work. I went Monday to the Paint Spot and every time I go I am extremely ambitious. They closed Monday before I was finished so I went back today around 6:30. I left when they closed tonight...at 9. So I spent a little under 5 hours working on 3 pieces there. They better be awesome!!! I'll be sure to post one of the 3 when I get them back, the other two are Christmas presents for 2 special (little) people in my life. :)


My precious nephews. Ethan (in daddy's Army hat) is 3 and Elijah (those cheeks are so yummy!) is almost 6 months. I love them!!
Well I have lots of posts coming (they're piling up in my head! especially after several Goodwill & Dollar Tree visits!) so don't go too far. :)
Goodnight all.
Well I started my new job yesterday (Tuesday) and so far so good. It's a lot of information, not a lot of explanation and a lot of me asking questions or going "huh?". It is taking me a while to adjust to a Monday thru Friday full time job again (haven't had that schedule since the end of last year!!). That would explain why I am up right now. My brain needs some good sleep, especially after day 2 of the job and finishing up my tedious projects at the Paint Spot after work. I went Monday to the Paint Spot and every time I go I am extremely ambitious. They closed Monday before I was finished so I went back today around 6:30. I left when they closed tonight...at 9. So I spent a little under 5 hours working on 3 pieces there. They better be awesome!!! I'll be sure to post one of the 3 when I get them back, the other two are Christmas presents for 2 special (little) people in my life. :)


My precious nephews. Ethan (in daddy's Army hat) is 3 and Elijah (those cheeks are so yummy!) is almost 6 months. I love them!!
Well I have lots of posts coming (they're piling up in my head! especially after several Goodwill & Dollar Tree visits!) so don't go too far. :)
Goodnight all.
Monday, October 11, 2010
Easy Halloween Wreath {Tutorial}
While browsing blogs I found this tutorial for a Halloween wreath. I thought it was a cute idea and would be easy to make. So I gathered my materials:

2. Start double knotting the fabric onto the hanger. Since I had more black I put a solid black piece after each orange piece so it wasn't too crazy. Every 12 inches or so, squeeze the ones you've completed together so you get the hanger covered and so that it looks full. Keep going until you run out of room to tie fabric on. I didn't have too many strips left over, maybe four of each pattern.
3. After I had all of the fabric knotted on I arranged the knots so that the fabric fell to the same side. Next, I wrapped the green ribbon (to make it look like a pumpkin) around the hook of the hanger securing it with hot glue ever so often. Then I made the bow and tied it on with jewelry wire.
Here's the finished product on our door.

- A wire hanger shaped into a circle
- Scissors
- 3 halloween fabrics, 1/4 yard each (cost $3.98)
- Black fabric, 1/2 yard ($2.11)
- Wired ribbon for a bow ($2.11)
- Hot glue gun
- Leftover green ribbon from wedding

2. Start double knotting the fabric onto the hanger. Since I had more black I put a solid black piece after each orange piece so it wasn't too crazy. Every 12 inches or so, squeeze the ones you've completed together so you get the hanger covered and so that it looks full. Keep going until you run out of room to tie fabric on. I didn't have too many strips left over, maybe four of each pattern.
3. After I had all of the fabric knotted on I arranged the knots so that the fabric fell to the same side. Next, I wrapped the green ribbon (to make it look like a pumpkin) around the hook of the hanger securing it with hot glue ever so often. Then I made the bow and tied it on with jewelry wire.
Here's the finished product on our door.

The good think with this wreath is that you could make one for any holiday. :)
Subscribe to:
Posts (Atom)
